How to Recover Deleted Files on Mac

No matter how hard you try, it’s virtually impossible to never accidentally delete a file on your Mac or MacBook Pro. When you realize that you have emptied the Trash after the deletion, your situation can appear hopeless. Don’t despair. We are going to show you several methods that can recover your lost data using native operating system functionality or recovery software. Disk Drill can recover lost files on your Mac even if they have been permanently deleted from the Trash. It’s also macOS Sequoia Ready!

Restore Deleted Files on a Mac from the Trash (Not Emptied Yet)

When you discover that some files are missing from your Mac, the first thing you should do is check the Trash Bin. The Trash Bin is a special folder that temporarily stores deleted files until it is emptied.

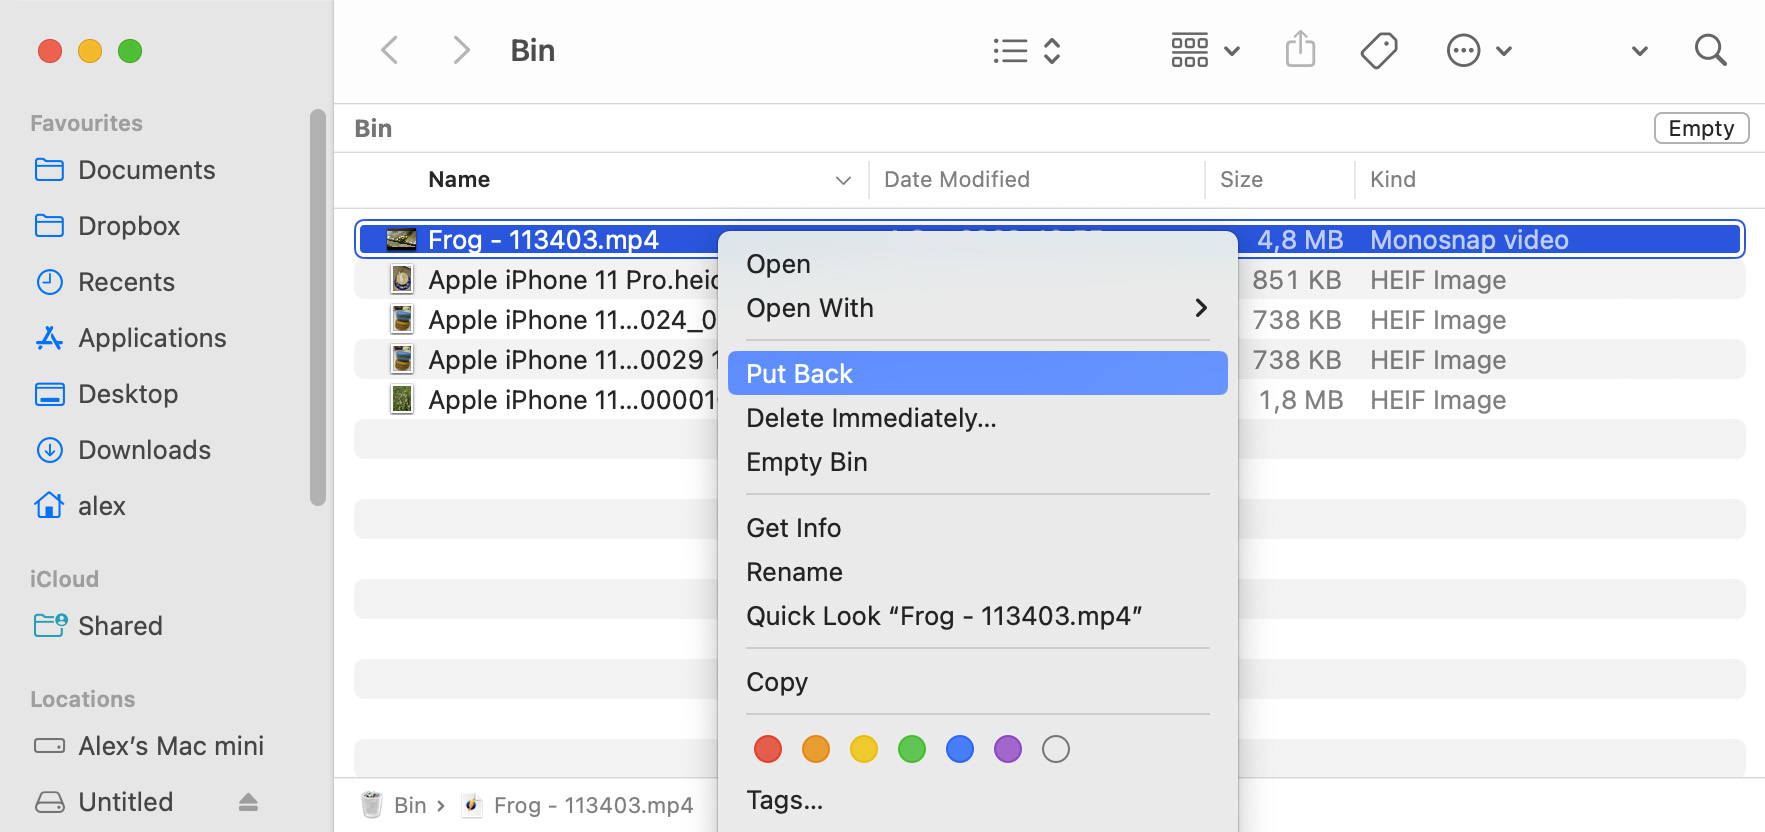
Follow these steps to recover files from the Trash on Mac:

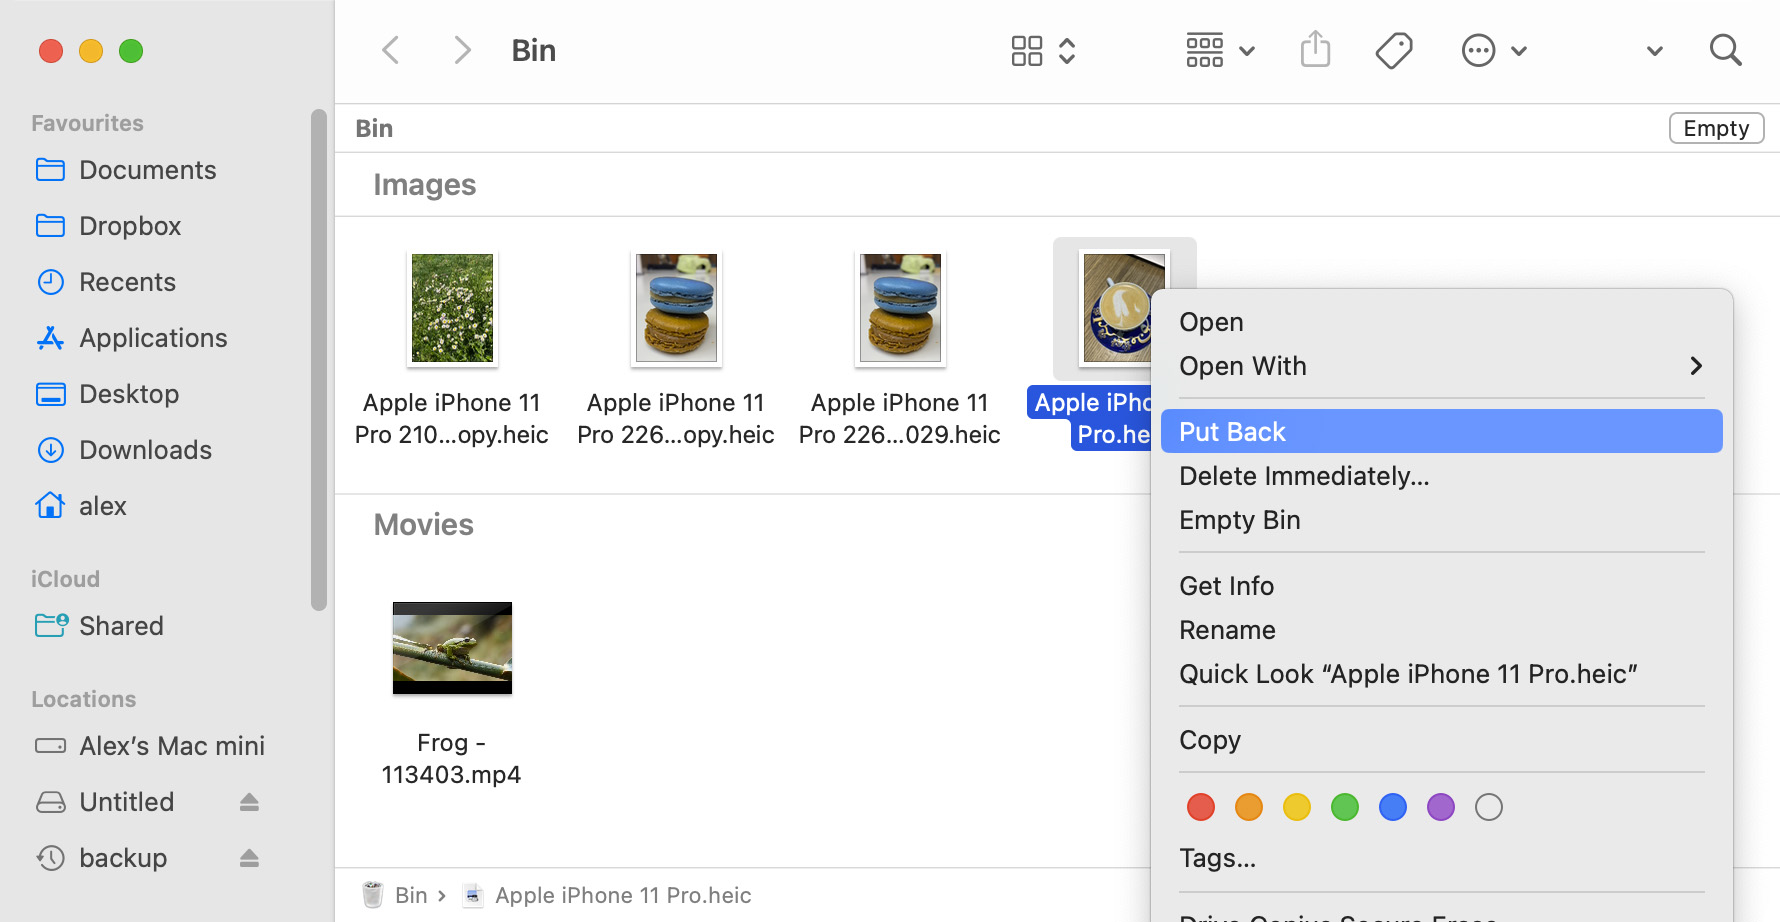
  1. Open the Trash Bin on Mac.
  2. Locate and select the missing files.
  3. Right-click any of the selected files.
  4. Select the Put Back option to restore deleted files on Mac to its original location.

External devices that are connected to your Mac also have a Trash Bin that can be used to recover lost files in the same way. macOS creates a hidden folder named ".Trashes" that contains the trash for that device. You can choose to show the hidden files after which you can use the ".Trash" folder for the external drive using the same procedure outlined above for your Mac’s main Trash Bin.

recover deleted files on mac

Steps to Recover Permanently Deleted Files on Mac

This comprehensive guide will walk you through the steps to recover permanently deleted files on your Mac using Disk Drill, showing you just how straightforward it can be to retrieve your lost data on Mac.

1. Download and Install Disk Drill for Mac

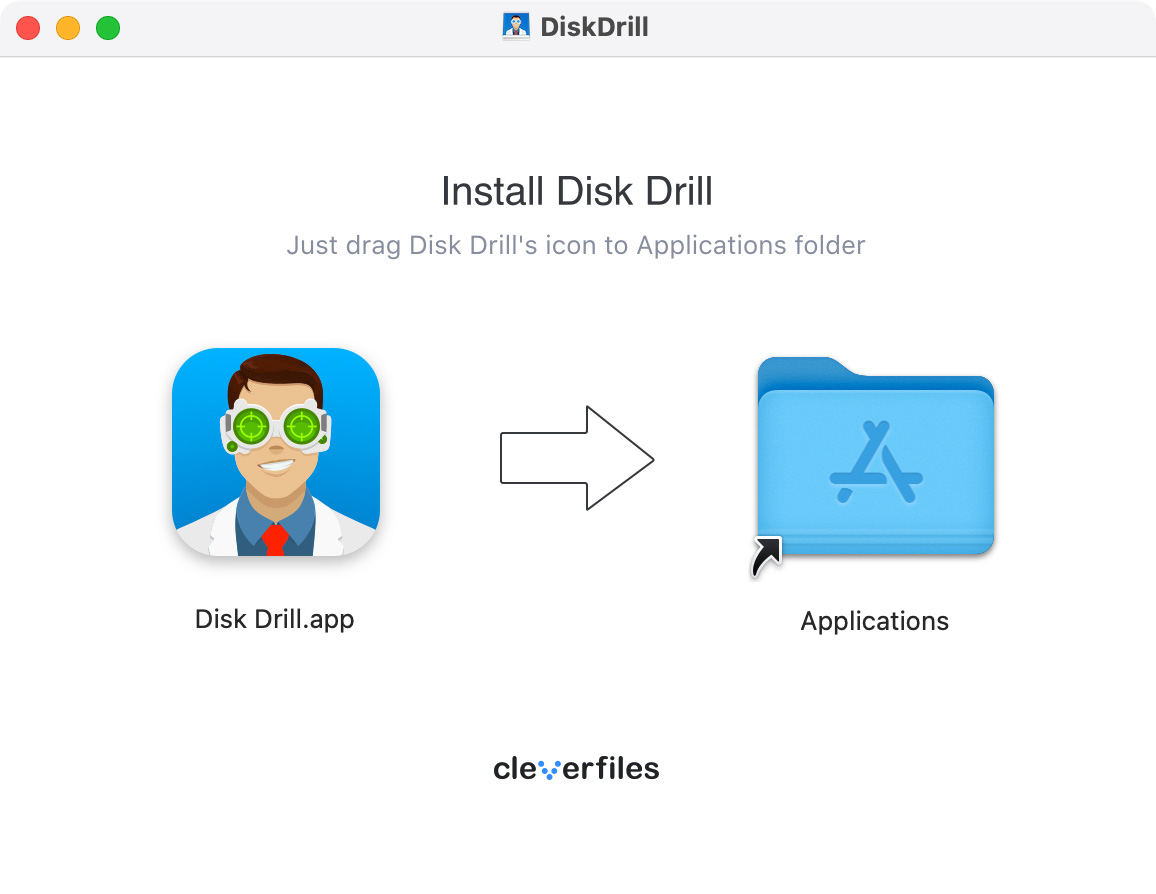
The first step is to download the free Disk Drill application from our website. It requires Mac OS X 10.8.5 or later. After downloading, find the "diskdrill.dmg" file in your Downloads folder and double-click on it. Drag the Disk Drill icon to your Applications folder if your goal is to recover files from an external storage device.If you want to recover your main Mac system drive, then you should drag Disk Drill to a folder located on another storage device instead to avoid overwriting.

recover deleted files from mac

2. Launch Disk Drill file recovery software on your Mac

Once Disk Drill is installed, go ahead and launch it. You will be asked to confim if you really want to open it since it’s a third-party application downloaded from the internet. Once you do that, you will see a button labeled “Install now.” Click on it and then grant Disk Drill Full Disk Access so that it can recover lost files.

If you need to recover deleted files on an external device, connect it to your Mac now. Skip this step if you wish to recover a deleted file on your Mac internal hard drive.

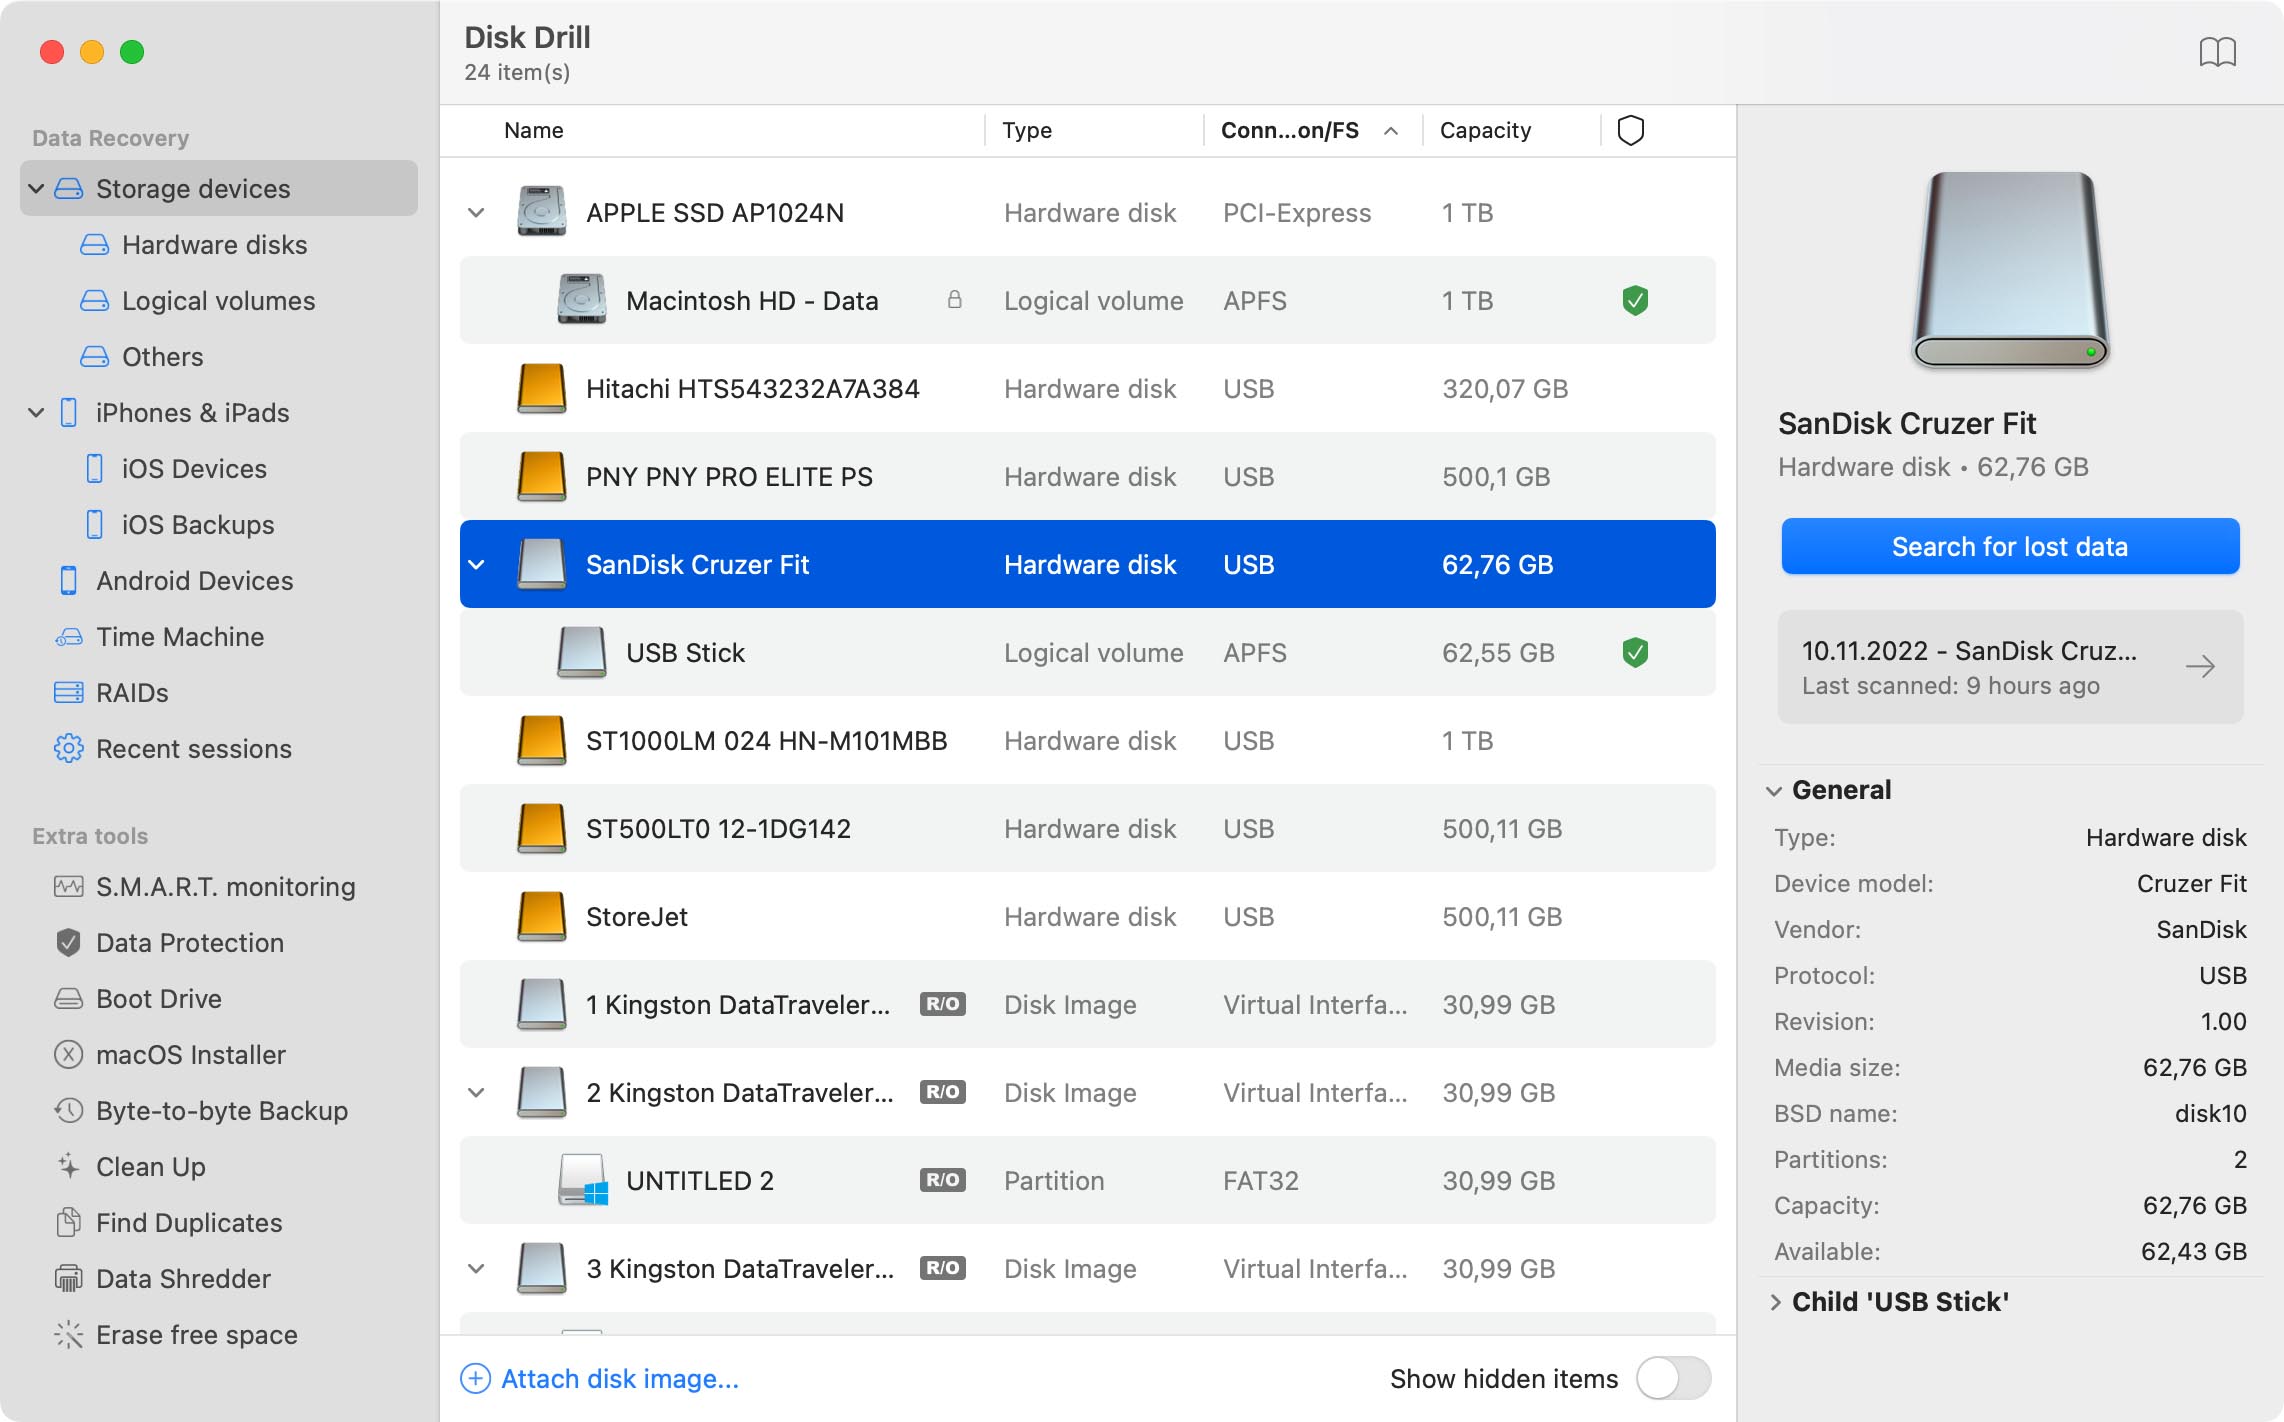
3. Select the Drive To Be Scanned

In the main Disk Drill window, there will be a list of the drives connected to your computer. Select the drive that you need to recover deleted files from and then click the “Search for lost data” button next to it. Disk Drill will run through all of its scanning methods, looking for files whose metadata is still intact (so filenames and file paths can be recovered) as well as files that can be recovered only based on their unique signatures. The following file systems are supported: HFS+, APFS, FAT32, exFAT, NTFS, and EXT4. Note: If you’ve decided to scan your system drive, then you will be prompted to install the required Kernel Extension.

get back deleted files on mac

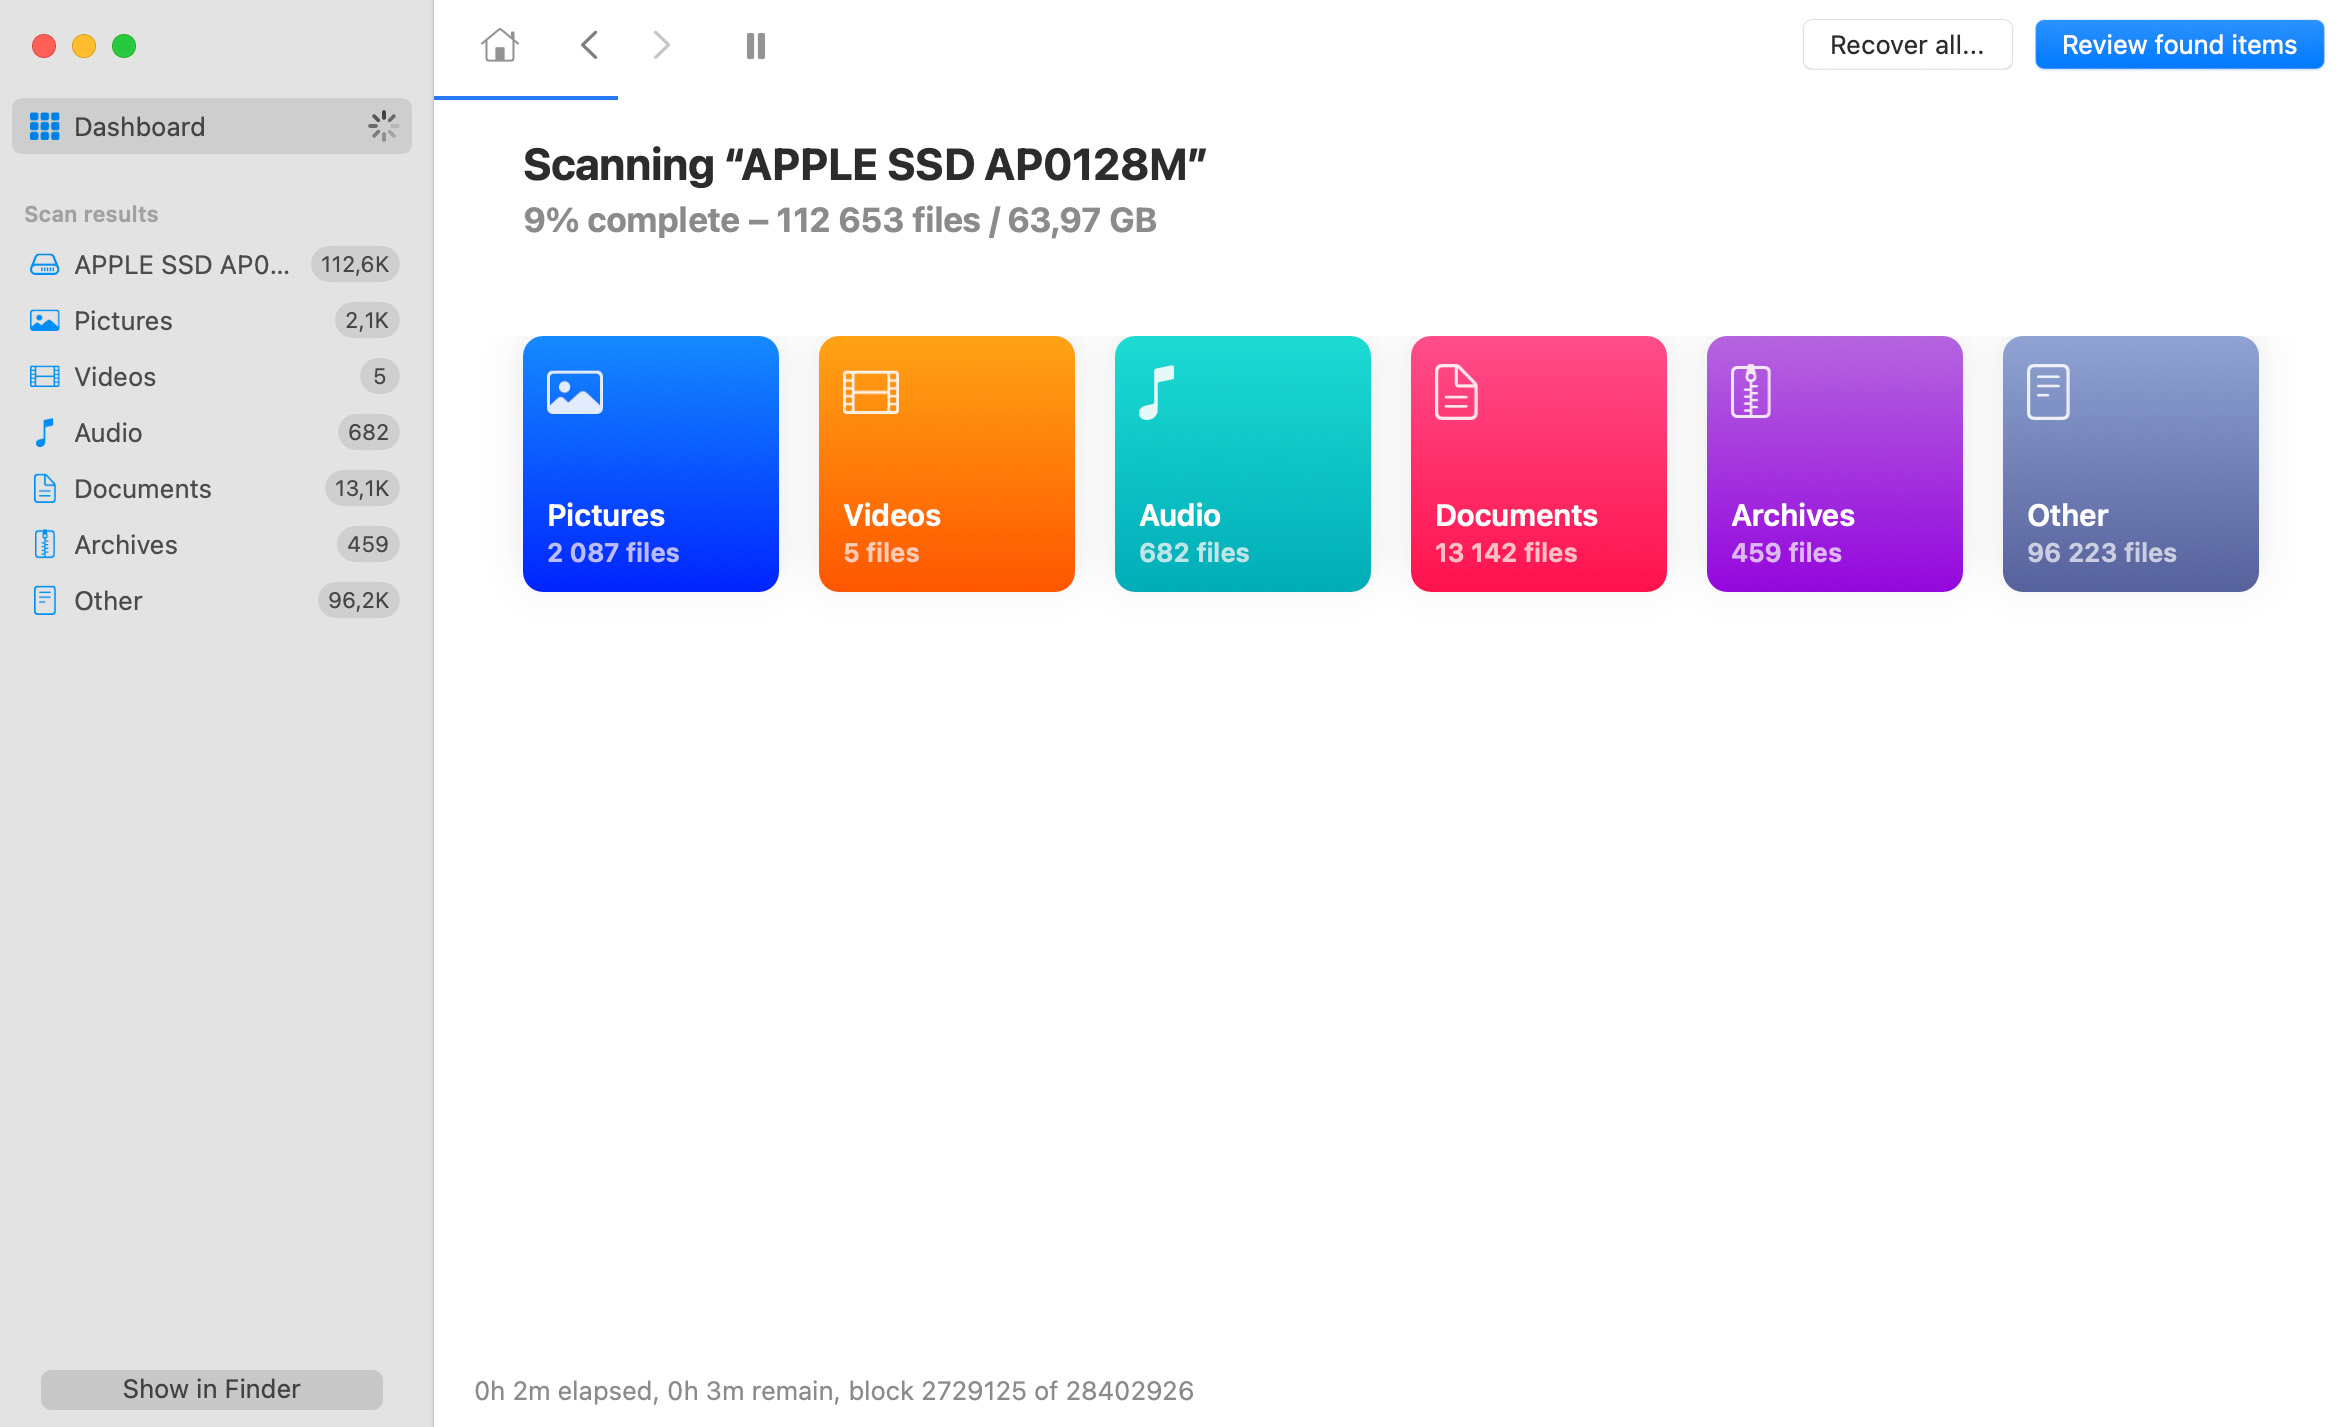
4. Wait Until Disk Drill Scans Your Drive

While Disk Drill works, it sorts found files into six types: pictures, videos, audio, documents, archives, and other. This makes it easy to see what it has found, with each type showing how many files are there.

If you're in a hurry, you can choose to look at the files Disk Drill has found even while it's still scanning. In fact, you can even pause the scan and recover deleted files from your Mac right away if they’ve already been located by Disk Drill.

how to recover deleted files mac for free

5. Select Your Deleted Files

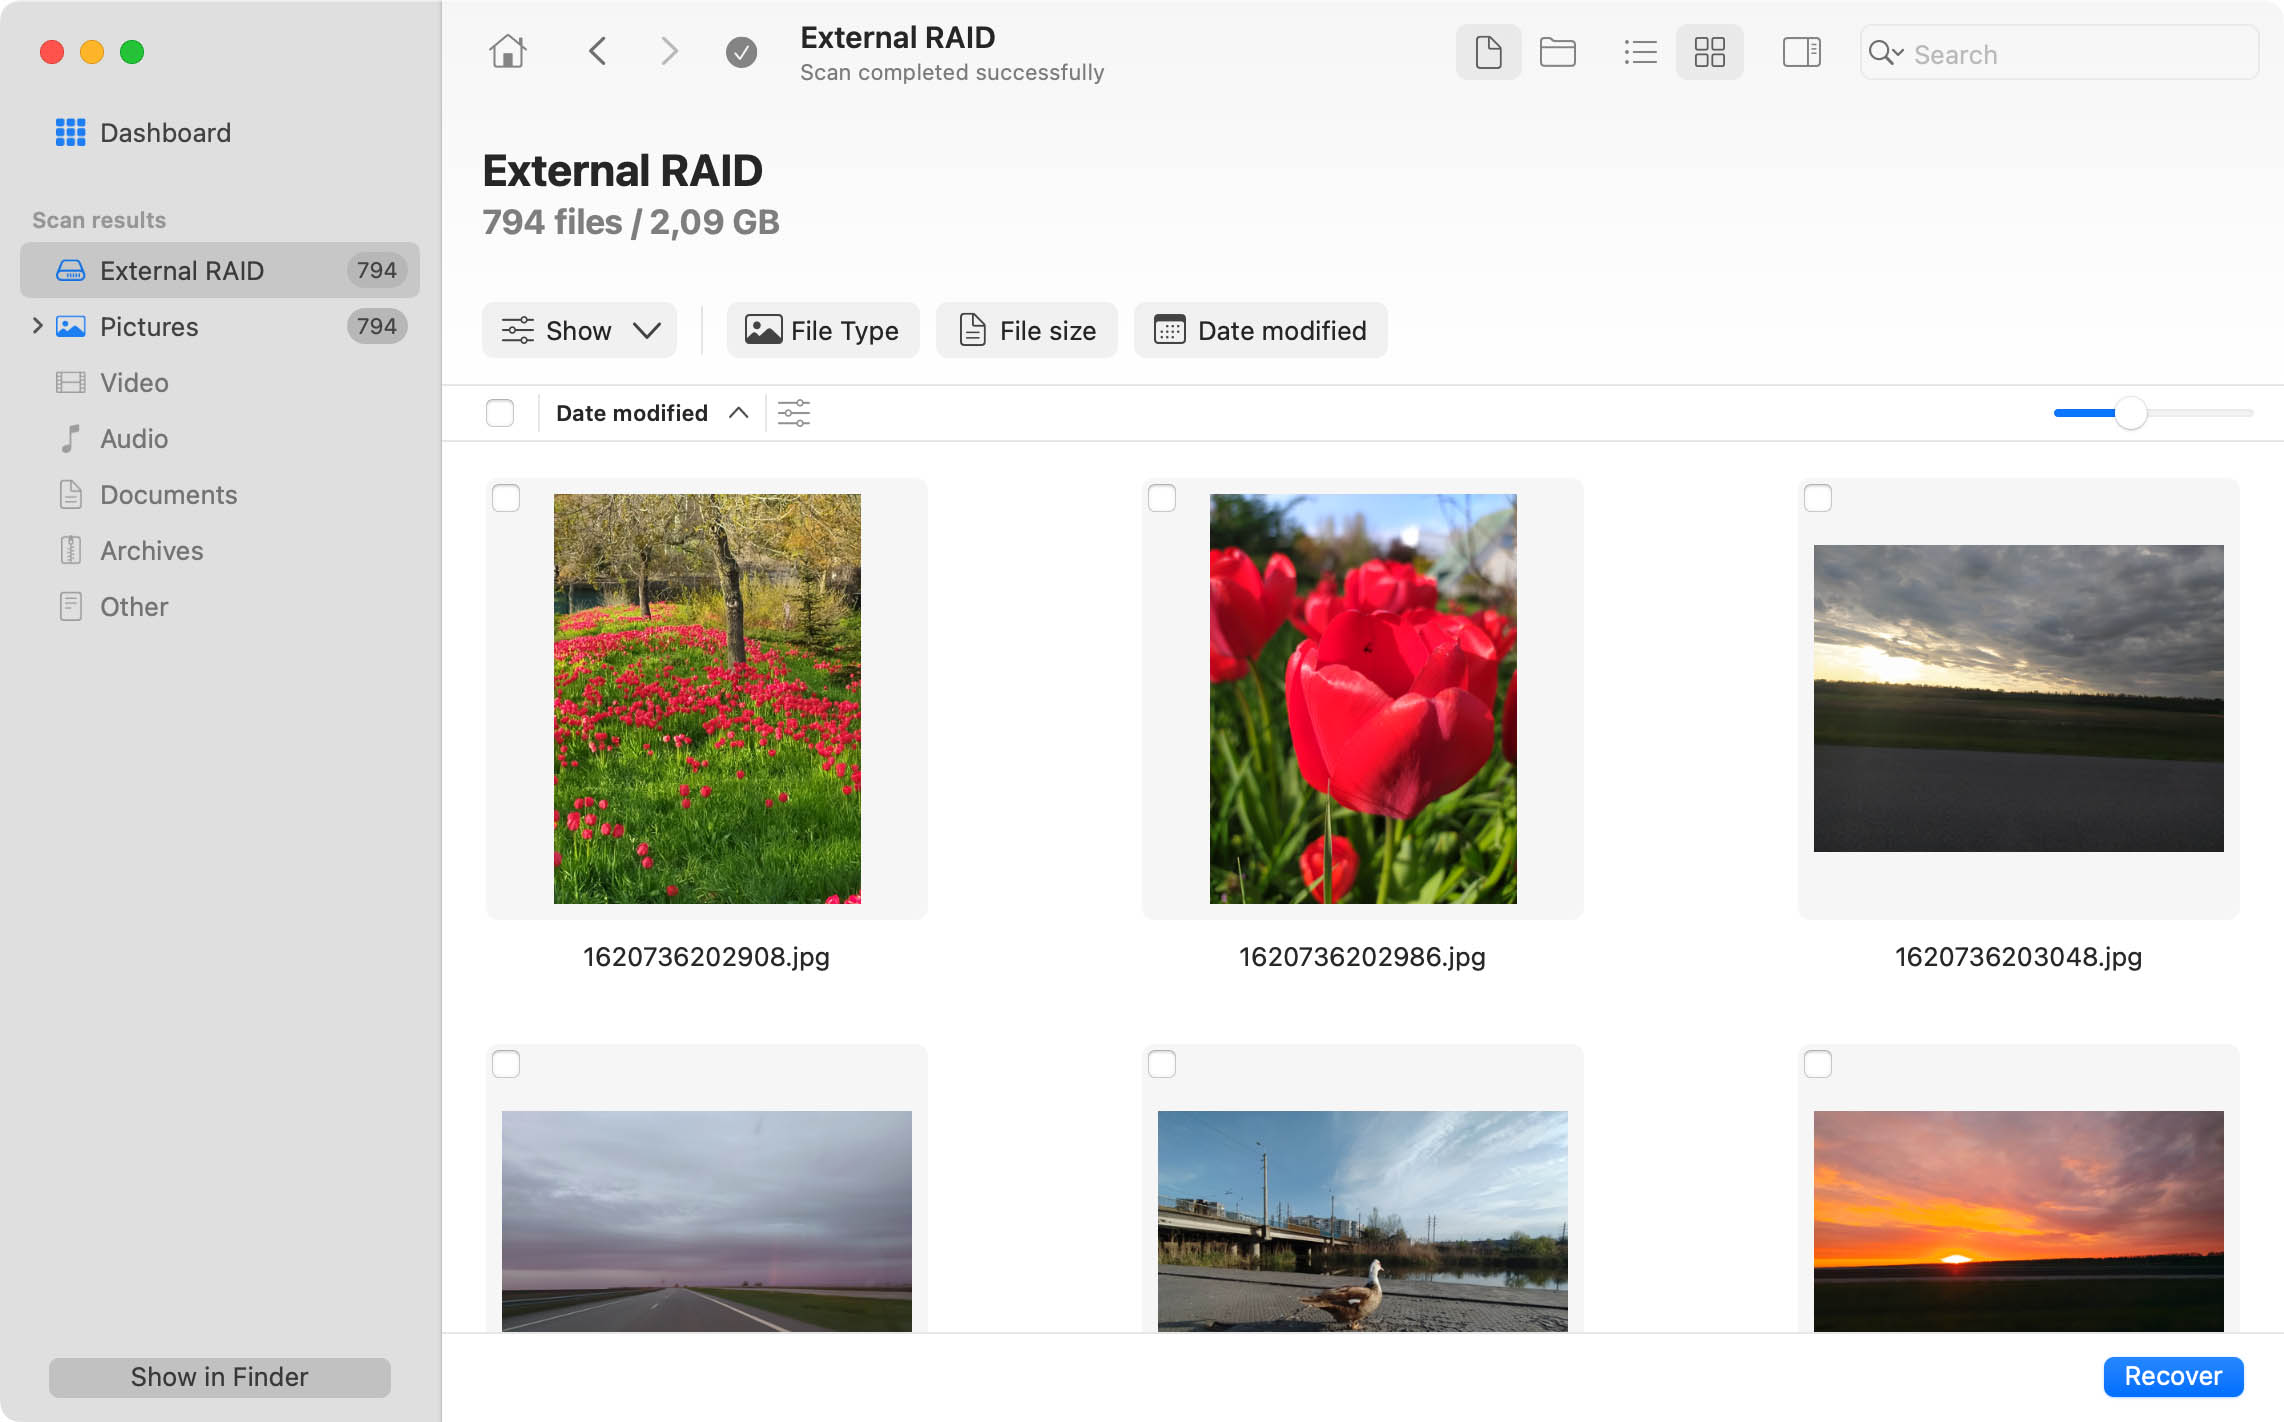
When Disk Drill is done scanning, you will be shown the list of the files it has found. If you are looking for certain files, you can sort the results to narrow down the number of files shown:

  • You can search for filenames by typing a keyword into the box with the magnifying glass on the upper left. Filenames are not preserved with Deep Scan, so you will need to narrow your results by date and file type;
  • You can also adjust the time to show only the files deleted within the last few days or weeks;
  • Click on any of the column headers to sort the list by that value.

When you find a potential file, click the "eye" icon next to the name to preview it. Some files may be corrupted, so previewing is the only way to know if the file is fully recoverable. After you have identified the deleted files on your Mac that you wish to recover, check the boxes next to their names.

retrieve deleted files mac

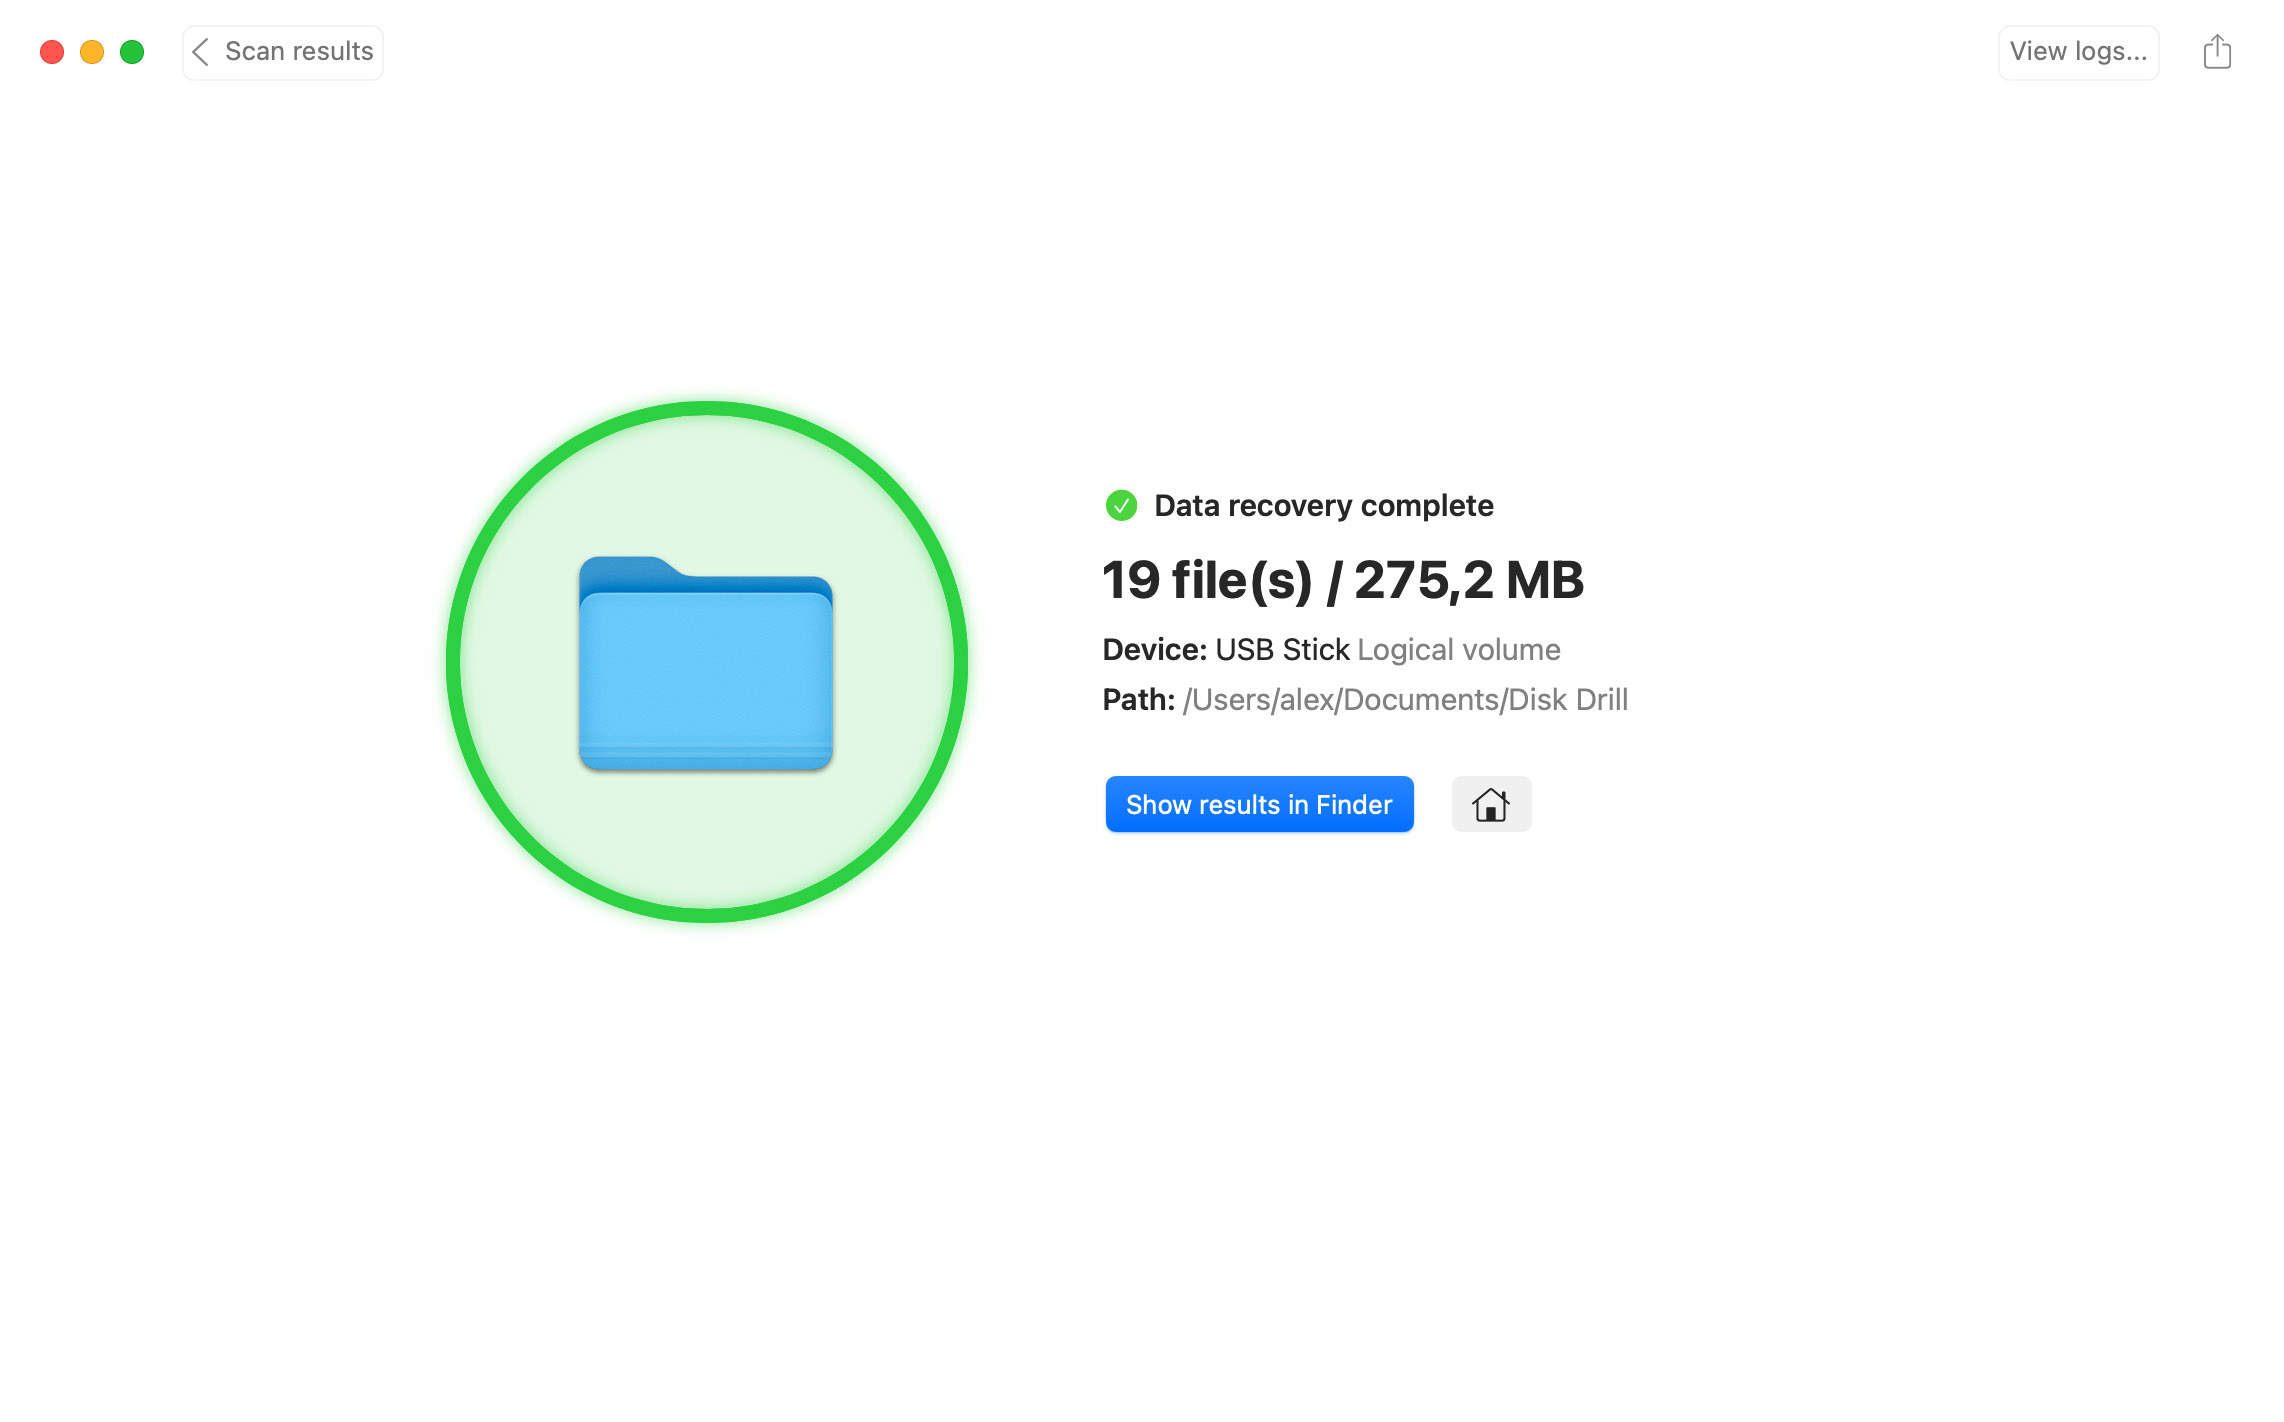
6. Recover Deleted Files on Your Mac

Once you have selected your files, click the Recover button in the bottom right corner. You will be asked to select a suitable recovery location (one that's on a different storage device than the one you're scanning). Disk Drill will automatically confirm whether the selected location is appropriate. If it is, then you can begin the actual recovery. If you haven’t upgraded to Disk Drill PRO yet, you will be prompted to do so in order to complete the recovery of your files. The free version of Disk Drill allows you to only scan and preview the recoverable files.

Congratulations! You now know how to restore deleted files on your Mac OS X.

recover the data from your mac

Device Types Supported by Disk Drill

Mac’s internal hard drives

Mac’s internal hard drives

Quickly recover lost and deleted data from your Mac’s internal hard disk or SSD* even after you have emptied the Trash.

External hard drives

External hard drives

Connect an external hard drive to your Mac and let Disk Drill scan it for lost files and restore your data.

Flash drives

Flash drives

Just plug your pen drive into the Mac’s USB port and select it in Disk Drill’s interface to recover your deleted flash drive files.

Memory cards

Memory cards

Recover deleted files from SD or other kinds of memory cards by using your Mac’s card reader.

NAS and RAID Systems

NAS and RAID Systems

Effortlessly recover various RAID configurations and NAS systems, commonly used in Linux, Windows, and Mac environments.

Android & iOS devices

Android & iOS devices

Plug in your Android or iOS smartphone or tablet to your Mac to recover deleted data with a few clicks.

!

* If TRIM is disabled. Learn more >

File Formats Supported

Pictures
Pictures

BMP, JPG, PCX, TIFF, and many other formats.

Videos
Videos

AVI, FCP, FLV, M4V are just a few of the supported file types.

Audio files
Audio files

MP3, WAV, WMA, and all other popular formats.

Documents
Documents

DOCX, XLSX, TXT, Pages, EPUB, and many more.

Raw Images
Raw Images

CR2, CR3, NEF, NRW, ORF, SR2, SRF from Sony, Canon, Nikon and other digital cameras.

Tips to Successfully Restore Deleted Files on a Mac

Here are some tips that will increase the probability that you can perform a successful data recovery.

Stop using the device

Stop using the device

The most impactful action to improve your Mac data recovery chances is to cease using the affected storage device immediately upon suspecting data loss. Continued use of the disk or partition risks overwriting the data you wish to restore. That’s why you should download data recovery software onto a different device than the one you're trying to recover.

Create a disk image

Create a disk image

Before you attempt recovery, you should create a backup disk image of the storage device you’re trying to recover to preserve its current state. With a disk image ready, you can attempt data recovery multiple times without worrying about overwriting or further damaging the original data.

Watch for a failing drive

Watch for a failing drive

Don’t ignore the signs of a failing hard drive. If you hear strange grinding noises, start noticing signs of data corruption, or see that the hard drive’s S.M.A.R.T. values look bad, it’s probably not your imagination. These issues will not correct themselves and are bound to get worse until the drive fails. Get your data off the device and to safer storage media as soon as possible.

Don’t recover to the original drive

Don’t recover to the original drive

To prevent overwriting the data you're trying to recover, avoid saving the recovered files back to the original disk. Instead, choose a different location, such as an external hard drive or, if you’re recovering a smaller quantity of files, a USB drive or memory card.

Check existing backups

Check existing backups

Before using data recovery tools, check any existing backups you may have. Whether it’s a Time Machine backup or a cloud storage service, you might already have the files you need. Restoring from these backups can often be the simplest way to get the missing files back on a Mac.

Use reliable data recovery software

Use reliable data recovery software

Invest in reliable data recovery software designed specifically for Mac. Your software of choice should support Apple’s proprietary file systems (APFS and HFS/HFS+), as well as other relevant file systems such as FAT32 and exFAT for external drives.

Ways to Recover Deleted Files on Mac without Software

Here are the procedures to use when attempting to restore your deleted files without software. You might want to try some of these methods before resorting to a software solution.

METHOD 1

Recover Deleted Files with the Undo Option

The macOS keystroke combination of Command-Z will often undo the last action you took with the operating system. Using the keystrokes repeatedly can undo the last several commands that you have entered. This can be extremely helpful if you realize you have just deleted an important file.

This method works when you send something to the Trash or perform a mass delete from within a document. Be warned that Command-Z cannot recover files once the Trash has been emptied. To recover files from emptied Trash, you need to use Disk Drill.

restore lost files via undo
METHOD 2

Recover Deleted Files on Mac from Trash via the "Put Back" Option

Here’s how to find and recover recently deleted files that are still in the Trash Can. The macOS saves deleted files temporarily and they are moved to the Trash, making them easily available for recovery.

To Recover Deleted Files from your Mac for free:

  1. Click on the Trash Can icon in your Dock to view all deleted files.
  2. Locate the file you want to recover.
  3. Drag deleted files to the desktop or right-click on the files you wish to restore.
  4. Select "Put Back" option to recover deleted files on Mac from the Trash to its original location.
trash put back option to recover deleted files
METHOD 3

Retrieve Deleted Files on Mac with Terminal

If you're unable to access your Trash the usual way (by clicking its icon in the Dock), then you can recover deleted files from it using the Terminal app. While this method requires you to enter some potentially intimidating commands, the recovery process is actually straightforward, as outlined below:

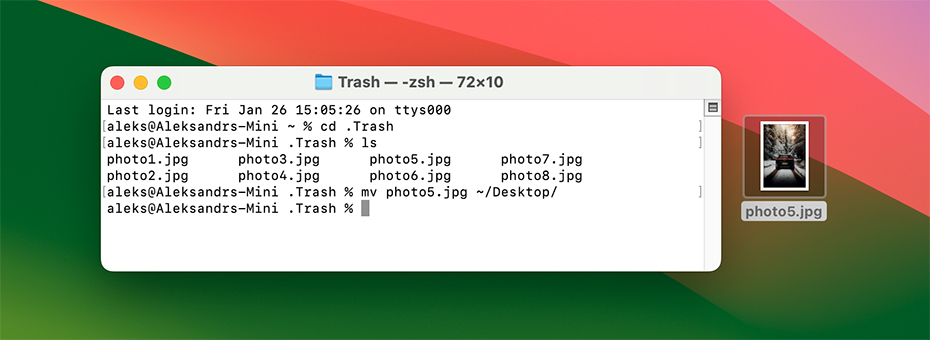
  1. Open the Terminal application on your Mac.
  2. Enter the command cd .Trash and hit Return to go to the Trash folder.
  3. Type ls and press Return. This command will display the contents of the Trash Bin, allowing you to see all the deleted files that are currently stored there.
  4. Use the mv command to recover your file by typing it in this format: mv [filename].[extension] [destination]. For example: mv photo5.jpg ~/Desktop/
  5. Type Quit to close Terminal.
  6. Open a Finder and navigate to the destination folder (Desktop in our case).
terminal file recovery option
METHOD 4

Restore Lost Files via Time Machine Backup

Time Machine is a freeware backup tool that comes installed with your Mac’s operating system. Many Mac owners use this valuable tool to protect their data. If you need to recover from a backup file, use the following procedure.

  1. Connect the storage media that contains the Time Machine backup to your Mac.
  2. Open a window displaying the folder which last contained the deleted file. For example, if you deleted something from the Documents folder, open a Finder window of the Documents.
  3. Open Time Machine by clicking on the clock icon on Mac’s menu bar and select Browse Time Machine Backups.
  4. Locate the items you want to restore from within Time Machine. There may be multiple versions of a file that has been modified and you can select the version that you want.
  5. Select an item to recover and press the Spacebar if you would like to preview it.
  6. Click Restore to recover the selected file or folder.
recover deleted files via time machine
METHOD 5

Use a professional - Mac Data Recovery Service

Sometimes your storage device has been physically damaged to the extent that it cannot be recognized by your operating system. In these cases, all the above methods except for Time Machine will fail and you will be left wondering what you can do to recover your data. A professional data recovery service may be able to restore your folders and files even if the device is physically damaged. A recovery service’s expert technicians can take apart the drive and clone it so its data can be recovered. This process is done in an environmentally controlled cleanroom to ensure the disks are not contaminated during the recovery. A reputable service like CleverFiles Data Recovery Center will not charge you if they cannot recover your data. It’s worth a shot if other methods fail and you need to get your data back.

recover deleted files in data recovery service
METHOD 6

Download your deleted files from iCloud

If you’re using iCloud Drive to store important files, then you should be able to easily download them from anywhere and any device by following these steps:

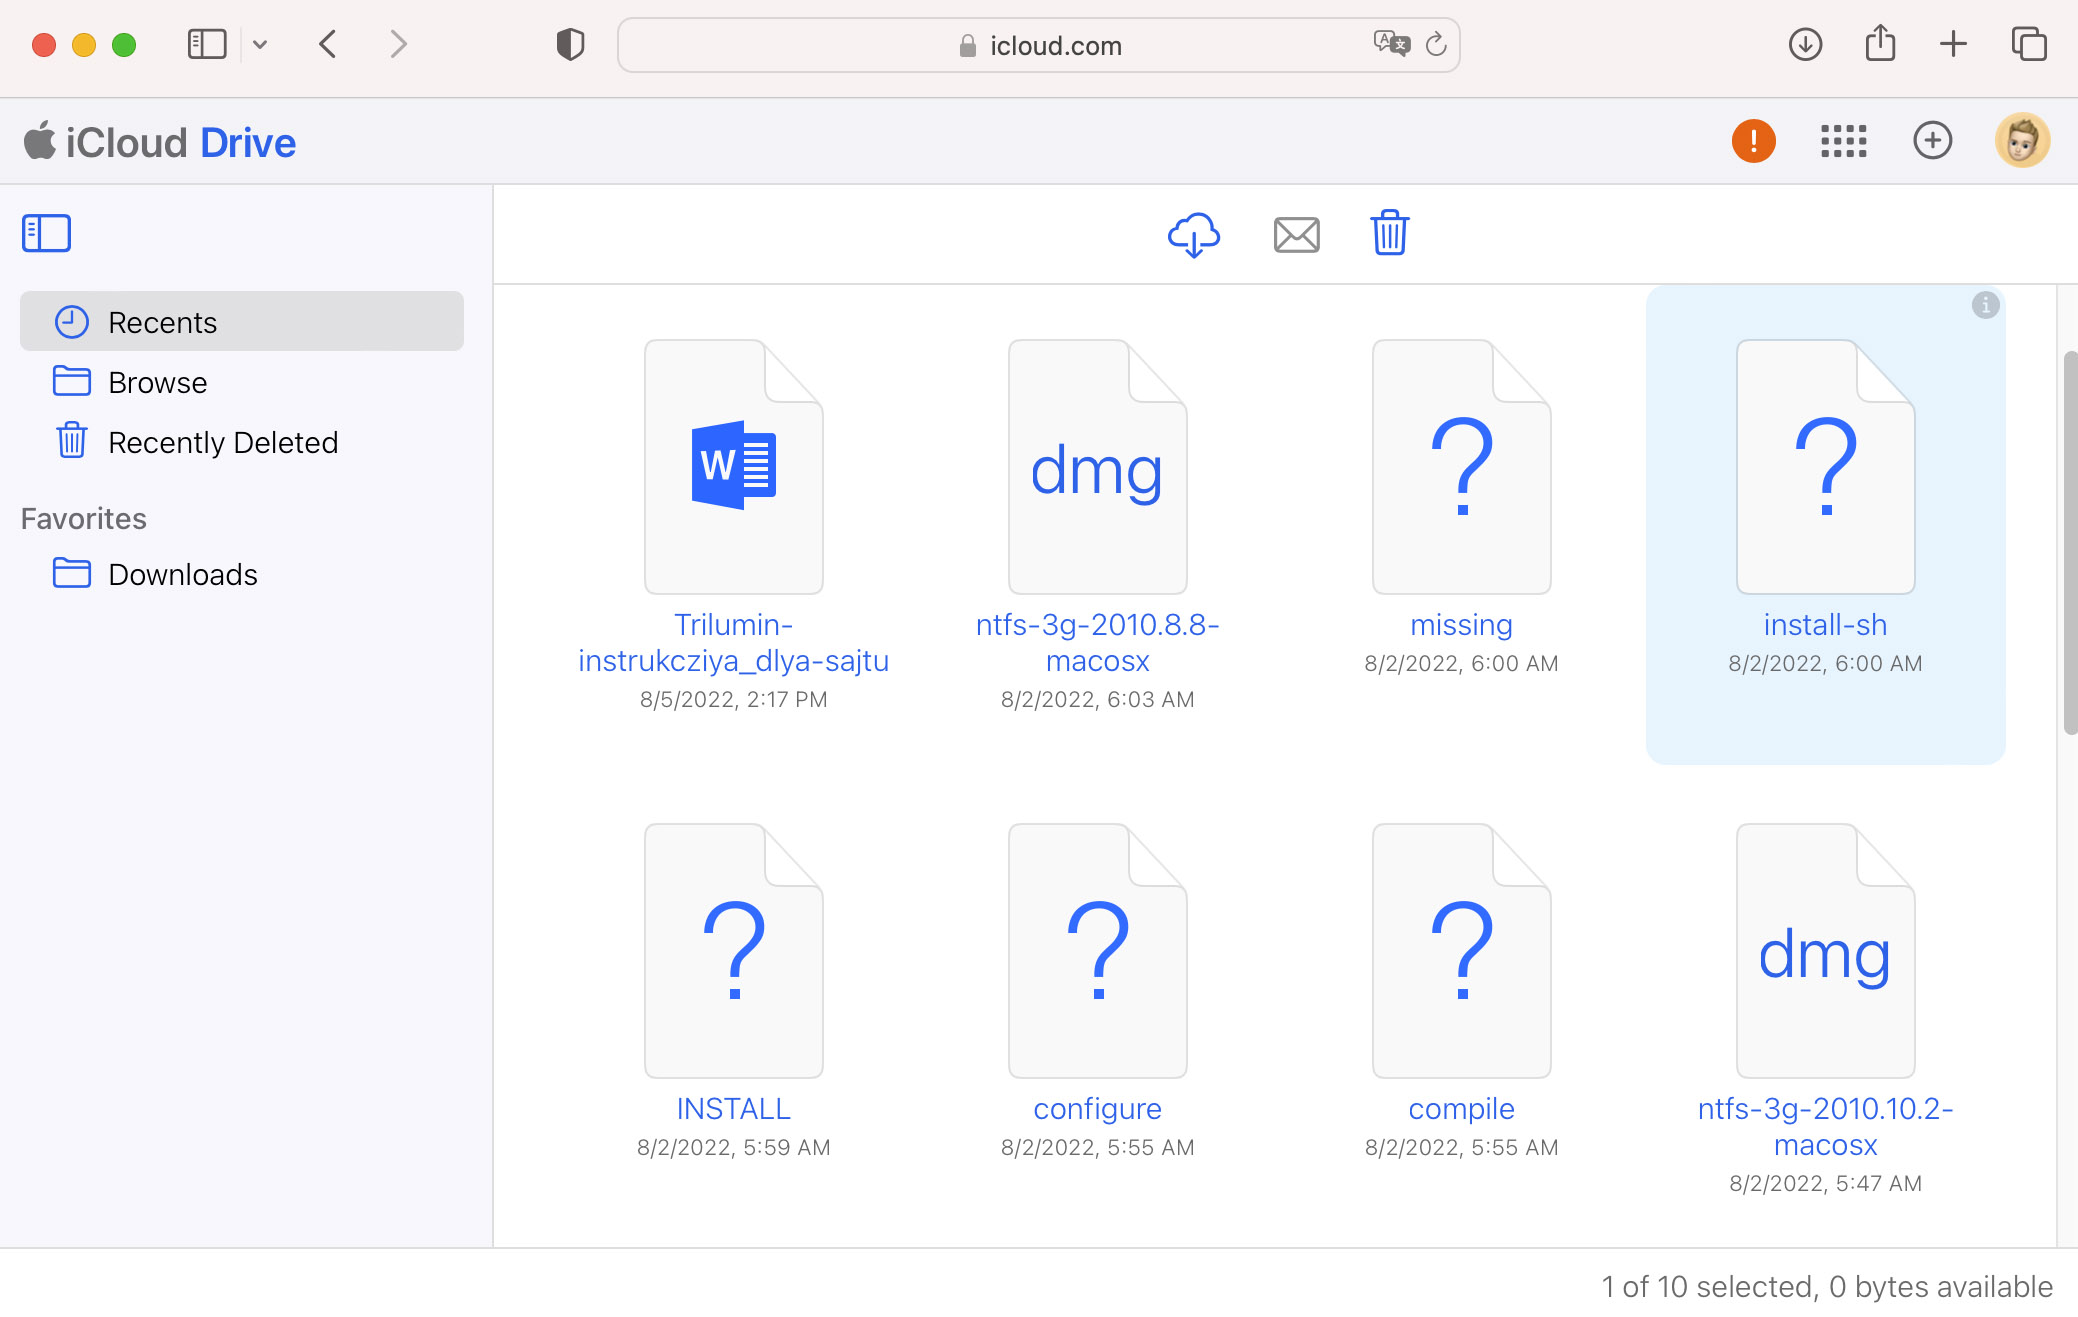
  1. Go to: https://www.icloud.com/
  2. Sign in to your iCloud account.
  3. Open Drive.
  4. Select the deleted file.
  5. Click the download icon to download the file to your Mac.
Download your deleted files from iCloud

Backup Your Mac to Prevent File Deletion

Backing up your files is one of the best ways to ensure your files are never permanently lost. You should make it a regular practice to back up the data on your computer to keep it safe. Disk Drill provides you with three options to make backups and protect your valuable data. The first backup option is called Recovery Vault, and it focuses on file metadata, significantly increasing the change of complete, successful recovery of deleted files while requiring only a small amount of storage space.

The second option is the Guaranteed Recovery feature. This feature stores full copies of important files, making it effective even on T2, M1, M2, and M3 Macs with encrypted system disks.

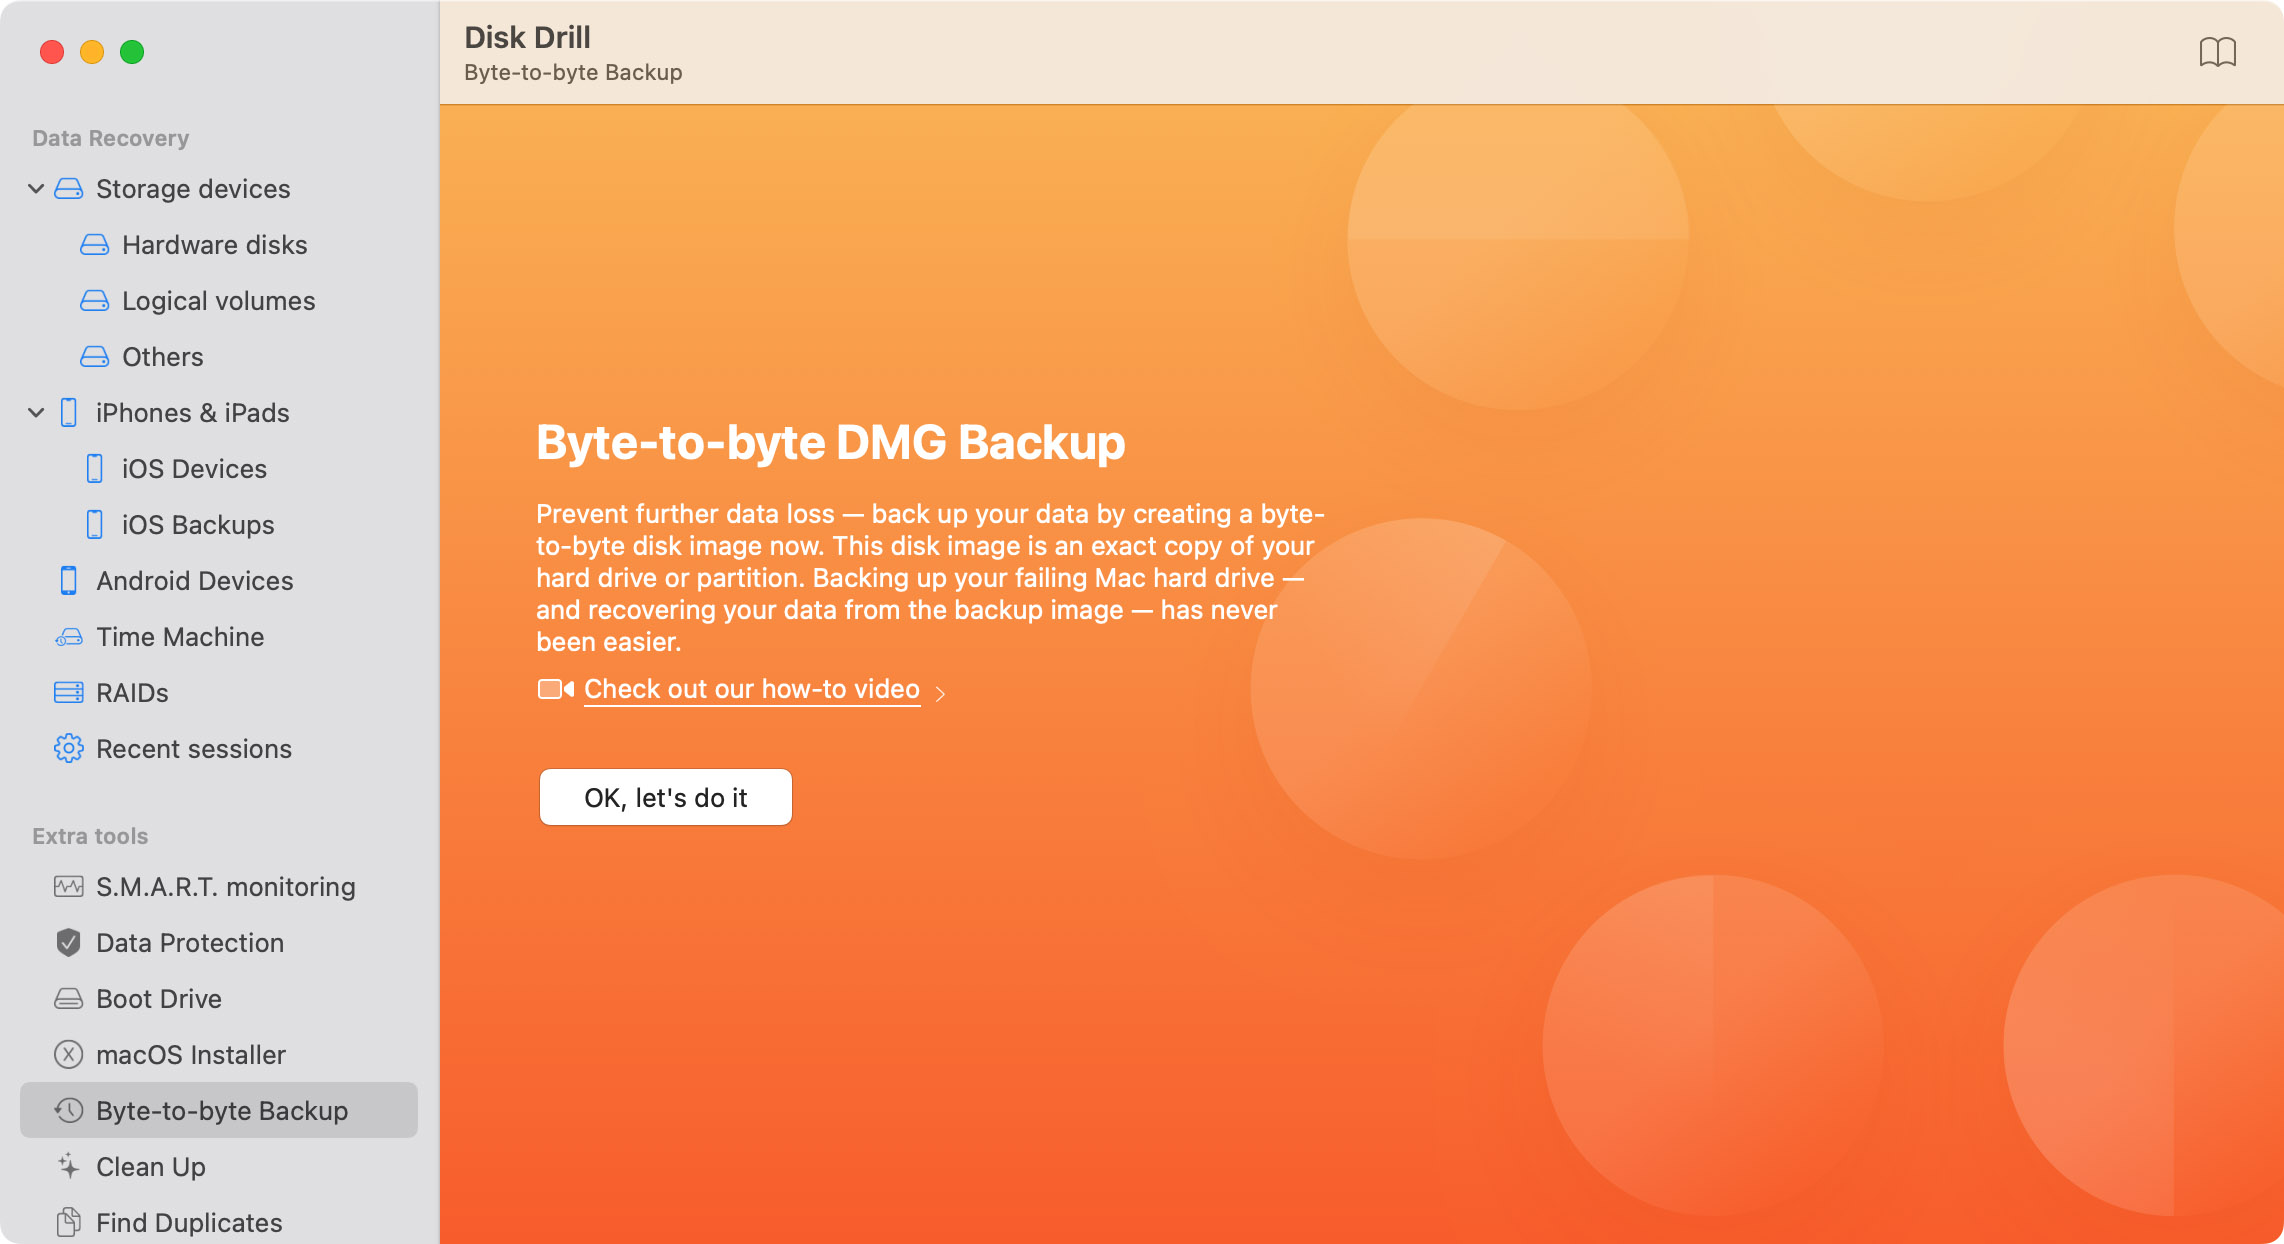
Finally, you can use the Byte-to-byte Backup tool to create a complete backup image of any unencrypted storage device. Backup images are ideal for preserving the state of your Mac or storage device at a specific point in time, which can be invaluable for disaster recovery. Keep in mind, however, that this method requires a storage space equal to the size of the backed-up disk.

Of course, you can (and should) enable Time Machine to complement these Disk Drill backup options. Time Machine, built into the macOS, provides an easy and convenient way to make regular backups of your entire system. It automatically keeps a record of all your files, allowing you to restore your entire system to a previous state or recover individual files.
retrieve deleted files mac

Situations Leading to Mac Data Loss or Deletion

There are a variety of reasons that you might lose data on your Mac. Here are some common scenarios:

Frequently Asked Questions

Updated on by Disk Drill Team

How to recover deleted files on my Mac?

Steps to recover deleted files on your Mac:

  1. Download, install, and launch Disk Drill for Mac.
  2. Select the disk or partition that contained the lost files.
  3. Click the Recover button to start scanning for deleted files on your Mac.
  4. Preview the recoverable files and choose a new location for them.
  5. Choose the deleted files you want to restore from a Mac and click the Recover button.

How to recover deleted files from the Trash on Mac?

Follow these steps to recover files from the Trash on Mac:

  1. Click on the Trash Bin icon on your Mac to open it up.
  2. Search for the files you want to recover.
  3. Right-click on the selected files and click Put Back to recover deleted files on Mac from the Trash to their original locations.

How to recover deleted files on Mac without software?

The best way to recover recently deleted files on your Mac is by using Time Machine backup. Just follow this simple procedure to recover deleted files from the Time Machine backup on Mac:

  1. Connect the device used to store your Time Machine backups to your Mac.
  2. Start Time Machine from the icon on the menu bar.
  3. Search the backups for previous versions of the files you wish to restore.
  4. Choose your files and click Recover to retrieve them.

Is it possible to recover deleted files on Mac?

Yes, it is possible to restore deleted files on your Mac. You can easily recover them from the Trash if they have been recently deleted. A Time Machine or other type of backup, the Terminal app, and the undo command can all be used to try to get your data back without using software.

Is there a way to recover emptied Trash on macOS?

Yes, there is. Data recovery software enables you to restore deleted files even after you have emptied your macOS Trash. This is because when the Trash is emptied, the files it contained still exist on your computer. They are logically inaccessible and data recovery software can repair the logical links, enabling the OS and applications to access the files again.

Can I recover deleted files using Terminal Command?

Yes, you can recover deleted files using the Terminal command, but you must use it before emptying the Trash. Use this procedure to give it a try:

  1. Open the Terminal Application.
  2. Use the cd .Trash command to navigate to the Trash folder containing recently deleted files.
  3. Use the mv command to move files from the Trash to new locations.

Can I recover permanently deleted files with the "Undo" option?

You can recover files that you have just deleted by using the Undo command by pressing the Command Z key combination. This command restores the files to their original location. It works from within a Finder window as well as many apps that allow you to create and delete files. This will not undo the command to empty the Trash.

How can I recover permanently deleted photos from my Mac?

You have a few different options to recover deleted photos on your Mac.

Here’s how to try using your Mac’s native Photo Application for recovery.

  1. Open the Photos application on your Mac.
  2. Click the Recently Deleted option under Library in the left-hand panel.
  3. Select the photos that you would like to restore.
  4. Click the Recover button in the upper right of the window.

If you use a cloud backup service such as iCloud, Dropbox or Google Photos, you may be able to use their apps to recover deleted photos. Most services keep deleted files for 30 days. In addition to making sharing files easier, the ability to restore from the cloud is one of the main benefits offered by these services. Specific steps will necessarily be based on the platform you use.

The most reliable way to recover permanently deleted photos from your Mac is with Disk Drill data recovery software. Follow these steps to get it done:

  1. Download and install Disk Drill on your Mac.
  2. Launch the app and choose the disk that contained the photos.
  3. Click Recover to start scanning for lost images.
  4. Preview the recoverable photos by filtering on Pictures and make your selections.
  5. Click Recover again to get back your valuable pictures.

How do I recover deleted files on my Mac for free?

This is how you can recover deleted files on your Mac for free:

  1. Open the Trash.
  2. Locate your missing files and select them.
  3. Right-click any of the missing files.
  4. Select the “Put Back” option.

How do you recover a deleted folder on a Mac?

You can get a deleted folder directly from the Trash Can with the following procedure.

  1. Open the Trash by clicking on its icon.
  2. Drag the items out of the Trash to the desktop or into a Finder window opened to your desired location.
  3. Alternately, right-click on the items and select the Put Back option to return them to their original locations.

Where are deleted files on Mac?

Deleted files are temporarily stored in the Trash Can for a predetermined amount of time or until the Trash is manually emptied. This is a special folder and you can view the files that have been deleted by opening the Trash and searching as you would in any other folder on your Mac. Files can be dragged out of the Trash or Put Back to their original location.

How to recover deleted files from a Mac guest account?

If you’ve enabled Time Machine on your Mac, you should be able to restore deleted files from a Mac guest account using the recent Time Machine backup.

Here’s how to restore deleted files from a Mac guest account via Time Machine:

  1. Connect the drive containing Time Machine backups to your Mac.
  2. Click the Time Machine icon on the menu at the top of the screen and choose Enter Time Machine.
  3. Use the timeline on the right to select the needed backup version.
  4. Once you’ve found the deleted file, choose it, and click Restore.

Should I try to recover the files using software or take my Mac to a data recovery service?

Unless you’re dealing with data loss caused by physical damage, then you should always try to recover your lost files using reliable data recovery software for Mac before resorting to a professional data recovery service because you have nothing to lose. Leading data recovery tools like Disk Drill offer a free trial that allows you to preview recoverable files before purchase so you can clearly see if the software is capable of recovering your lost data. Moreover, using data recovery software is often faster and more cost-effective than sending your Mac to a professional data recovery service.

No Macs in your household? Recover deleted files on your Windows computer.

More How-To's on How to Restore Files on Mac

How do I recover lost data?

See what Disk Drill fans say

22 hours later, I have all 700GB back. Big props to @Cleverfiles for helping me recover everything, INCLUDING the file structure of my SSD.
Read more
The new version of Disk Drill for Mac introduces numerous usability and under-the-hood enhancements to deliver the best data recovery experience and results. - Filipe Espósito
Read more
Used by world famous companies